Data Tables
Data Tables

Summary
The Data Tables feature allows tabular data tables to be entered in Revit, essentially providing lookup tables that may be utilized by other eVolve functions. Tables can be created manually or imported from Excel.
- eVolve tab ⮞ Utilities panel ⮞ Data Tables button


Usage
Creating a Data Table
- From the Data Tables window, in the grid, click into any cell from the 'Click here to add a new row,' specify the required information, and click Apply.
Required:
- Name
Optional:
- Description
- Group
- Sub Group
- Read-Only checkbox

Adding data to an existing Data Table
Creating columns
- From the Data Tables window, select the desired data table, and click the Edit Table button.
- From the Data Table: TableName window, click the Add Column button.
- From the Data Table: TableName: Add Column window, specify a value in the Column Name field, select an option in the Data Type menu, and click OK.
- Repeat steps 2 and 3 until all desired columns are added.
- From the Data Table: TableName window, click OK to save changes.

Adding row data
Once the data table's column names and types are specified, you may begin populating the table with data.
- From the Data Tables window, select the desired data table, and click the Edit Table button.
- From the Data Table: TableName window, from the 'Click here to add a new row,' at the top of the grid, click below the desired column, and enter the necessary data.
TIP: Pressing the Enter or Tab keys will shift focus to the immediate cell to the right, while the arrow keys shift focus in their respective directions. - Repeat step 2 until all desired data is entered and click OK.

Importing from Excel (into a new data table)
- From the Data Tables window, select the desired data table, and click the Edit Table button.
- From the Data Table: TableName window, click Import from Excel.
- From the Data Table: TableName window, navigate to the desired Excel file (.xlsx), select the file, then click Open.
- The items are imported. Click OK from the confirmation window.
- From the Data Table: TableName window, click OK.

Importing from Excel (updating an existing data table)
As of the 7.4 release and higher, when importing an Excel file into a data table, EVOLVE will allow additional rows to be appended without clearing the existing data.
- From the Data Tables window, select the desired data table, and click the Edit Table button.
- From the Data Table: TableName window, click Import from Excel.
- From the Data Table: TableName window, navigate to the desired Excel file (.xlsx), select the file, then click Open.
- From the Import from Excel window, click the Select the import mode menu, and choose the Keep existing data and append imported enties option.
- The items are imported. Click OK from the confirmation window.
- From the Data Table: TableName window, click OK.
Additional importing notes:
If the append type import is canceled, all rows imported are removed (leaving only the rows that existed before the import started).
On append imports, the following pre-checks are done:
- Columns which exist in the current data table but are missing from the import sheet
- Columns that exist in the import sheet but do not have an exact matching column name in the current data table
When either check is detected, a notification is displayed that these columns are skipped as part of the import.
If the data type differs between the data table and the import file, e.g., the current table has a number value, and the import sheet has a text value. EVOLVE will attempt to import the data, but it may not fully import if the item cannot be converted to the column's data type.

- It is assumed column headers are on row 1 in Excel.
- If column headers have duplicate names, only the first encountered in the Excel sheet is used (the other is ignored).
- Columns created by the import can specify their data type by having the respective header column title in Excel end with one of the following (spacing is important). When provided, this indicator is removed and not used as part of the header text:
,integer- Column data type should be an integer number.,decimal- Column data type should be a decimal number.,boolean- Column data type should be true/false.,text- Column data type should be text.- The default value if this is not provided is text.
- It is expected that if the column defines the data type, then all cells in that column are of that type. If not then the respective cells are imported with a blank value.
- Excel column header examples:
- Value 1 = Header value is “Value 1” / Type is text.
- Value 1,integer = Header value is “Value 1” / Type is integer.
- Value 1,decimal,text = Header value is “Value 1,decimal” / Type is text.

Window Overview
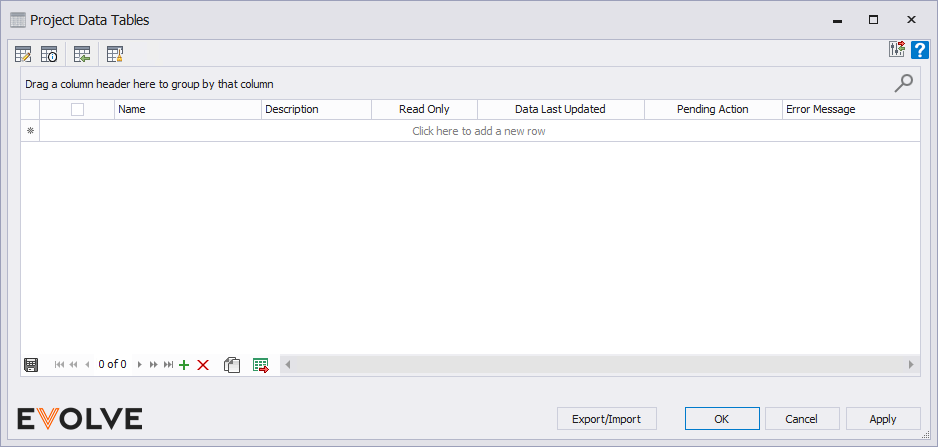
Overview of the Data Tables window
Tool palette buttons
- Edit Table - Opens a dialog to edit the in-focus table row.
- If the table is flagged as read-only or Data Tables is currently work-sharing checked out to another user, the dialog will only have a Cancel button (which effectively makes the table read-only
- View Table Info - Displays basic data regarding the selected tables in respect to their size.
- Import Tables (Deprecated as of v6.2) - Allows for importing individual selected entries from a file which can be used to interchange data across projects.
- Clear Cache - Resets the internal cache, which is used for optimization when fetching data tables. This will have a “passive” performance impact but is likely not noticeable to the user.
- Configuration Exchange - Used to import/export rules; please see the Configuration Exchange article for more information.
NOTE: If the table is flagged as read-only or Data Tables is currently worksharing checked out to another user, the dialog will only have a Cancel button (which effectively makes the table read-only).
Grid Columns
- Name - Must be unique and contain only letters, numbers, and spaces.
- Description - used to provide additional information about the Data Table.
- Group - used to assign a category/type to a data table.
- Sub Group - used to a subset of a group/category to a data table.
- Read Only - Specifies if the respective entry is intended to be unalterable. The user can change this without warning but this is intended to prevent inadvertent changes.
- Data Last Updated - (read-only) Indicates the last time an entry within the respective data table was modified.
Data Navigator buttons
- Add - used to add a new row to the grid.
- Delete - used to delete selected row(s).
- Duplicate - used to duplicate selected rows.
- Export grid - exports the grid as currently displayed to Excel.

The Edit Table grid
The Edit Table function allows users to enter data for existing tables.
Tool palette buttons
- Add Column - Prompts the user for the column name (must be unique) and what type of data the column holds. This will add the column to the end of the table.
- Remove Column - Removes the focused column from the table entirely.
- Import From Excel - Imports a table from Excel.
- View Column Info - Display technical data on each column.
- Metadata - Allows for freeform data to be associated with the table. This does not impact the row/column data but is “attached” to the table and provided to any implementers to use how they see fit.
- Import From Excel - Imports a table from Excel.
Data Navigator buttons
- Add - used to add a new row to the grid.
- Delete - used to delete selected row(s).
- Duplicate - used to duplicate selected rows.
- Export grid - exports the grid as currently displayed to Excel.
- BulkUpdate - Allows users to update values for selected entries.

Tips and Tricks
- Most grids in eVolve have the option to send data to a data table. Look for this button
 in the record navigator located at the bottom of all grids.
CAUTION: Sending data to a data table will overwrite the existing data.
