Workset Manager
Workset Manager
The Workset Manager feature expands on the capabilities and uses of the Revit Workset tool. Users can use the Workset Manager to assign multiple categories to a workset and create and assign rules to worksets. These can also be applied automatically or manually. This feature can end the time-consuming task of manually assigning drawn elements to worksets.
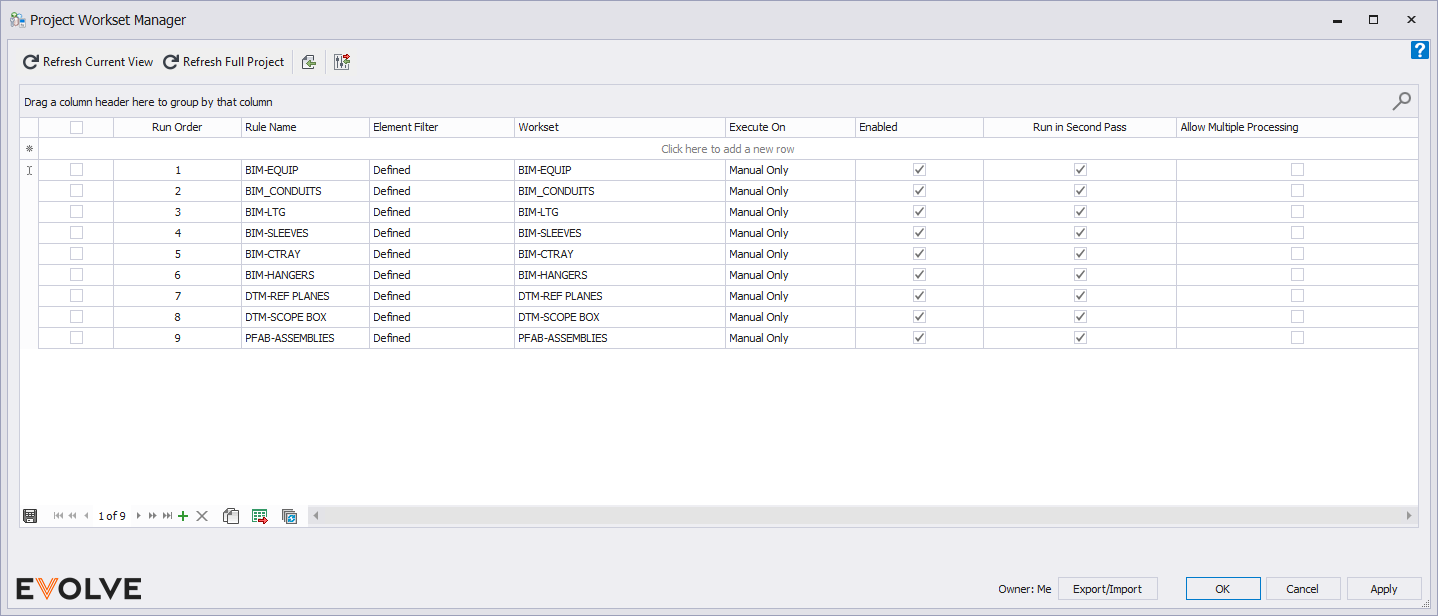
Tool Palette buttons
- Refresh Current View - used to re-run the selected rules on the current active view.
- Refresh Full Project - used to re-run the selected rules on the entire project view.
- Export Rules (Removed as of 6.2)- used to transfer the selected rules to another project.
- Import Rules (Deprecated as of v6.2) - used to bring in rules from another project.
- Configuration Exchange - Used to import/export rules; please see the Configuration Exchange article for more information.
Grid Columns
- Run Order - used to define the sequence in which the rules are executed, 1 is 1st, 2 is 2nd, 3 is 3rd, etc.
- Rule Name - used to apply a label to a rule.
- Description - used to provide additional information about the rule.
- Group - used to assign a category/type to a rule.
- Sub Group - used to a subset of a group/category to a rule.
- Element Filter - used to define the categories and optional conditions which elements and their parameters are filtered against.
- Workset - used to define the workset the rule is run against.
- Enabled - if unchecked, the rule is disabled and will not run.
- Execute On - defined when/how the rule runs.
- Manual Only - the rule will only run when either the Refresh Current View or Refresh Full Project button is manually clicked.
- Any Update - the rule runs when any change to the drawing is made.
- New Element Creation - the rule will only run when an element is placed on the drawing area.
- Existing Element Change - the rule runs when an existing element is modified.
- Run in Second Pass - indicates whether the rule runs after all other processing has been completed; see below for more information.
- Allow Multiple Processing - gets or sets a value indicating whether multiple processing of the same element is allowed in a single execution session; see below for more information.
Record Navigator buttons
- Add - used to add a new row to the grid.
- Delete - used to delete selected row(s).
- Duplicate - used to duplicate selected rows.
- Export Grid - exports the grid as currently displayed to Excel.
- Bulk Update - allows for the values in multiple selected rows to be revised at once.
Managing Worksets
- From the Manage Collaboration panel, in the Collaborate ribbon, ensure the project is set up as a workset-enabled project.
- From the Utilities panel, in the eVolve Mechanical ribbon, click on Workset Manager.
- From the Project Workset Manager window, in the grid, select a cell from the Click here to add a new row and specify the following:
Required
- Rule Name - the name does not have to be unique as you may utilize Description, Group, and Sub Group to further distinguish it from other profiles.
- NOTE: if a Workset has its name changed in the model then the user must update any Workset Manager rules which were using the old name to use the new name.
- Element Filter - defines the elements the colorizer rule will color.
- View Filter - when defining the View Filter, select the Views category and any optional conditions the view(s) must adhere to run the colorizer rule.
Optional
- Run Order - automatically assigned if undefined.
- Description - blank if left undefined.
- Group - blank if left undefined.
- Sub Group - blank if left undefined.
- Enabled - the default state is unchecked; remember to check this option or the rule will not run.
- Execute On - the default value is Manual Only if left undefined.
- Run in Second Pass - the default state is checked.
- Allow Multiple Processing - the default state is checked.
- After the Required and Optional fields are defined, click Apply. The new row is added to the grid.
To View Color-Coded Worksets in View
To get a look at the various worksets in a view, each with its own color, use the Revit Worksharing Display feature at the bottom left of the modeling area. Click the Worksharing Display button in the View Control Bar, and select the Worksets option from the menu. Preset colors will be applied to each workset. These colors can be changed by selecting Worksharing Display Settings from the Worksharing Display menu.

Run in Second Pass
The Run in Second Pass option allows users to run rules after Revit and EVOLVE have completed processing instead of before. Basically, if the Run in Second Pass option is unchecked when a rule runs and the expected elements are not colored, check the Run in Second Pass option.
NOTE: If the same parameter is being changed in both the first pass and second pass the updating of the second pass parameter(s) change will fail, throwing an error. However, parameters may be changed multiple times in the same pass.

Allow Multiple Processing
A common situation for this would be where an element is added and modified during the same execution session (e.g., drawing conduit with bends). When this value is true, the rule would execute for same element twice, once in the "add" context and again in the "modify". When false, the rule would execute only for the "add" context.
A case where you would want each:
- False = If you have a status column and want to track when something is was just modeled (new) vs. modified after it was modeled (changed). If you draw some conduit, having this setting on false would ensure that everything drawn in the run comes in as “new” because each element would only process the element added event. If you had this setting on true instead, [most] everything would come in as “changed” because the edit event would be processed and update the status field.
- True = When you need to always process the most up to date info. Typically this is only required when you need the geometry and it can change during a single edit session. This does incur some processing overhead as an element may actually be processed by Revit several times instead of just on the add and edit.
NOTE: that an execution session is defined as where control is returned to Revit in the since the user can select elements, change views, etc. For example drawing conduit the user cannot select elements (so the execution session remains active) until they ESC out of the drawing operation.
