Parameter Sync

Parameter Sync

Summary
The Parameter Sync feature creates rules to sync values between two parameters within a specified Revit category.
- eVolve tab ⮞ Utilities panel ⮞ Parameter Sync button


Usage
To Sync a Project Parameter
IMPORTANT: DO NOT synchronize data to any eVolve Mechanical parameters with the eM_ prefix unless you are sure that these parameters are custom-shared parameters that your company has created. This will cause issues when eVolve attempts to sync to the parameter to/from ITM-related fields.
- From the eVolve ribbon, in the Utilities panel, click the Parameter Sync button.
- Enter a value in the Run Order field for the new sync rule.
- Enter a unique Rule Name and an optional Description for the new sync rule.
- Define an Element Filter. Once defined, the Copy from Parameter and Copy to Parameter fields will populate with available values.
- Under Copy from Parameter, select a parameter to copy from.
NOTE: You may specify any parameter, even if it's not displayed in the list, by simply wrapping the parameter name in angle brackets or chevrons - e.g. <ParameterName>. - Under Copy to Parameter, select a parameter to copy to.
- Define the Execute On option.
- Select the Enabled checkbox to allow the rule to be used in the current project.
- When finished creating rules, click OK.

Window Overview
The Parameter Sync window
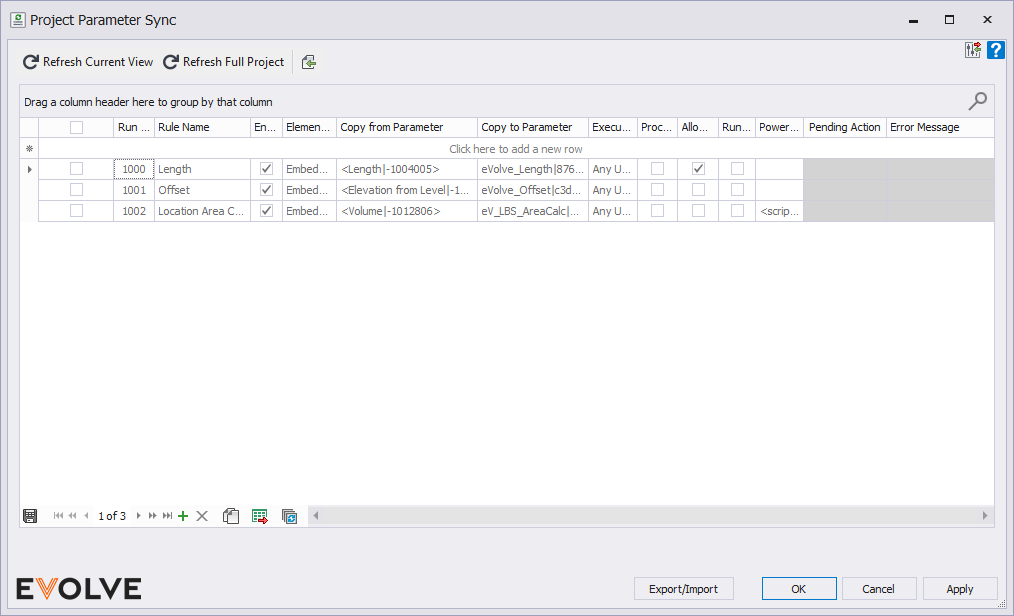
Tool Palette buttons
- Refresh Current View - used to re-run the selected rules on the current active view.
- Refresh Full Project - used to re-run the selected rules on the entire project view.
- Export Rules (Removed as of 6.2)- used to transfer the selected rules to another project.
- Import Rules (Deprecated as of v6.2) - used to bring in rules from another project.
- Configuration Exchange - Used to import/export rules; please see the Configuration Exchange article for more information.
Grid Columns
- Run Order - used to define the sequence in which the rules are executed: A is 1st, B is 2nd, C is 3rd, etc.
- Rule Name - used to apply a label to a rule.
- Description - used to provide additional information about the rule.
- Group - used to assign a category/type to a rule.
- Sub Group - used to a subset of a group/category to a rule.
- Element Filter - defines the categories and optional conditions against which elements and their parameters are filtered.
- Copy from Parameter - specifies the parameter in the element filter from which the data will be copied.
- PowerShell Script - (optional field) runs a PowerShell script during sync. See below for additional information.
- Copy to Parameter - specifies the shared parameter to which the data will be copied.
- System - System rules ship natively with the product and are vital to functionality. These are non-editable rules.
- Enabled - if unchecked, the rule is disabled and will not run.
- Execute On - defined when/how the rule runs.
- Manual Only - the rule will only run when the Refresh Current View or Refresh Full Project button is manually clicked.
- Any Update - the rule runs when any change to the drawing is made.
- New Element Creation - the rule will only run when an element is placed on the drawing area.
- Existing Element Change - the rule runs when an existing element is modified.
- Run in Second Pass - indicates whether the rule runs after all other processing has been completed; see below for more information.
- Allow Multiple Processing - gets or sets a value indicating whether multiple processing of the same element is allowed in a single execution session; see below for more information.
Record Navigator buttons
- Add - used to add a new row to the grid.
- Delete - used to delete selected row(s).
- Duplicate - used to duplicate selected rows.
- Export Grid - exports the grid as currently displayed to Excel.
- Bulk Update - allows the values in multiple selected rows to be revised simultaneously.
Common Uses
- Exposing Global and Family-based parameters for tags and schedules.
- Adding parameters to eVolve Properties Panel
- Combing parameters for easier filtering in schedules
The chart below helps demonstrate which parameters can natively be used for annotating.
Source: Paul Aubin
Kind of Parameter | Who Creates it | Where does it live | Appear in Tags | Appear in Schedules |
System Parameters | Built in | Project and Family | Yes | Yes |
Shared Parameters | User Defined | Project and Family | Yes | Yes |
Project Parameters | User Defined | Project | No | Yes |
Global Parameters | User Defined | Project | No | No |
Family Parameters | User Defined | Family | No | No |

Tips and Tricks
Using PowerShell Scripts
eVolve allows the ability to inject PowerShell during the sync process. This allows users to harness PowerShell to concatenate information, replace text, round values, and many other functions. eVolve also provides the element's context. Through this, you can harness the Revit API to further your script's power. To use, follow standard Revit API calls while still following PowerShell syntax for your logic and structure.
Limitations
- Though you are given access to the Revit API, you cannot use it to make changes to the model. This ability is available within separate transactions. If this functionality is necessary, please refer to Macro Automation.
- Also, this ability must be manually turned on with the **Workstation Settings**.
Script Samples
- The following example gets the CenterLineLength fabrication property and returns its information to be written to the Copy to Parameter.
# Return the Point Description of sleeve
return $eVolveElement.CenterLineLength
- The next example demonstrates the ability to retrieve the Document within the script and then use its available methods to write the element's Room location to the Copy to Parameter.
# Return the Room Location of the element
$doc = $eVolveElement.Document

$Max = $eVolveElement.get_BoundingBox($doc.ActiveView).Max

$Min = $eVolveElement.get_BoundingBox($doc.ActiveView).Min

$eloc = ($Max + $Min) / 2

$room = $doc.GetRoomAtPoint($eloc)
$roomname = $room.LookupParameter('Name')

return $roomname.AsString()

Run in Second Pass
The Run in Second Pass option allows users to run rules after Revit and eVolve have completed processing instead of before. If the Run in Second Pass option is unchecked when a rule runs, and the expected elements are not colored, check the Run in Second Pass option.
NOTE: If the same parameter is being changed in both the first pass and second pass, the updating of the second pass parameter(s) change will fail, throwing an error. However, parameters may be changed multiple times in the same pass.

Allow Multiple Processing
A common situation for this is when an element is added and modified during the same execution session (e.g., drawing conduit with bends). When this value is true, the rule will execute for the same element twice, once in the "add" context and again in the "modify". The rule would execute only for the "add" context when false.
A case where you would want each:
- False = If you have a status column and want to track when something was just modeled (new) vs. modified after it was modeled (changed). If you draw some conduit, having this setting on false would ensure that everything drawn in the run comes in as “new” because each element would only process the element-added event. If you had this setting on true instead, [most] everything would come in as “changed” because the edit event would be processed and update the status field.
- True = When you must always process the most up-to-date info. Typically, this is only required when you need the geometry, and it can change during a single edit session. This does incur some processing overhead as Revit may process an element several times instead of just on the add and edit.
NOTE: An execution session is defined as when control is returned to Revit, and the user can select elements, change views, etc. For example, when drawing conduit, users cannot select elements (as the execution session remains active) until they ESC out of the drawing operation.
Multiple Parameter Processing
This allows for multiple parameters to be processed in the same rule for the same element.
Upfront, this requires PowerShell to accomplish as the return is a "complex type" (a Hashtable to be exact) which maps a parameter name to its respective value.
Consider this basic example which will result in the Comments parameter on the element being assigned Hello world and Mark to PowerShell wuz here:
# This initializes a hash table/key value pair structure.
$data = @{ }

# Add parameter names as the key and assign the target value.
$data["Comments"] = "Hello world"
$data["Mark"] = "PowerShell wuz here"

# Return type is expected to be the hash table itself.
return $data
Of course, an unlimited number of parameters and more complex logic can be added to perform multiple calculations when assigning values - it's PowerShell after all.
Options
By default, Parameter Sync raises an error if tries to set a parameter on an element that does not exist. This new feature has the capability to ignore/bypass this error by providing a special key: ^ignore_missing^ = $true (case-sensitive!)
$data = @{ }

# This tells Parameter Sync to ignore any missing parameters on the source element.
# Without this (or with the value set to false), it will raise an error when the return contains a parameter that does not exist
$data["^ignore_missing^"] = $true

$data["Comments"] = "Good Vibrations"
$data["MarkyMark"] = "and the Funky Bunch"

return $data- A new column is available (hidden by default), Multiple Parameter Processing, which is simply a checkbox. When this value is checked:
- It signifies the rule uses this alternate processing method
- PowerShell Script is required to be provided
- Copy to Parameter is ignored (and not required to be provided) as the script result defines the target parameters
