Point Settings
Point Settings

Summary
The Point Manager Settings area allows users to define and configure various settings regarding the point coordinates, backgrounds, and linked points.
- eVolve tab ⮞ Resources panel ⮞ Settings menu ⮞Point Settings button


Window Overview
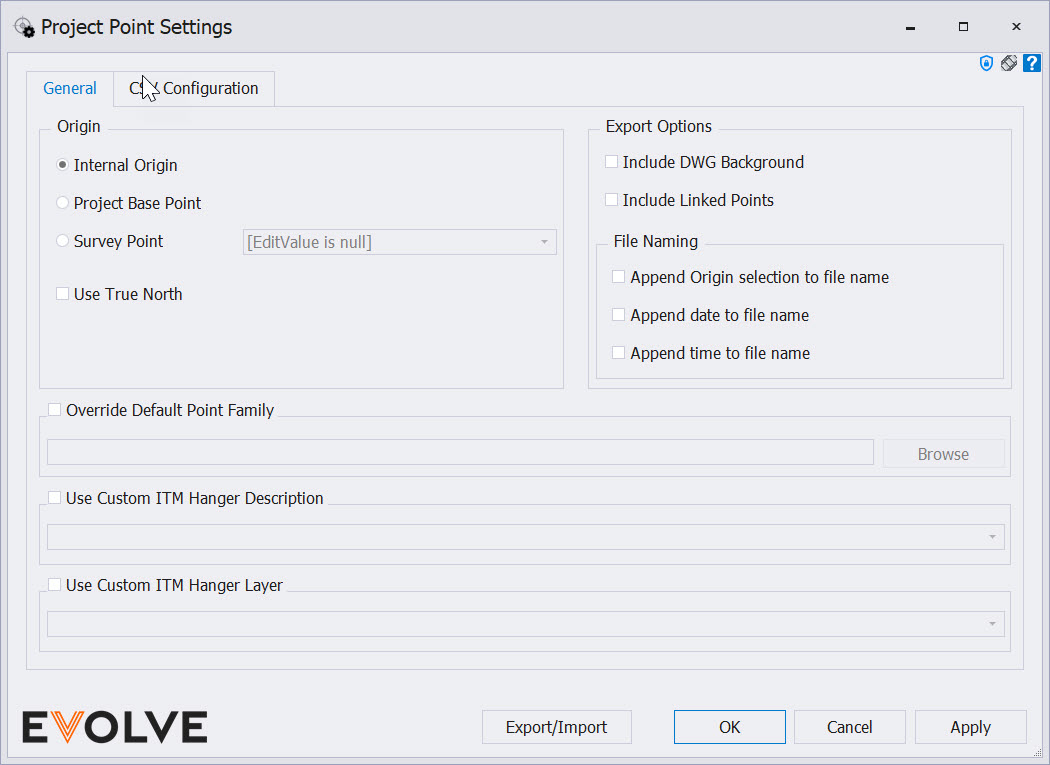
Point Settings\General tab

Origin panel
- Internal Origin radio button - Changes the reference point system the X, Y, and Z coordinates are based on. This point is invisible and always at the zero coordinates (0,0,0) in Revit. By default, every import and export will be in relation to this point, and it cannot be changed. The rotation of the Project Base Point is to orientate the model to "True North"
- Project Base Point radio button - defines the origin (0,0,0) of the project coordinate system. Use the project base point as a reference point for measurements across the site.
- Survey Point radio button - identifies a real-world location near the model, such as a corner of the project site or the intersection of two property lines. It defines the origin of the survey coordinate system, which provides a real-world context for the model.
- Use True North checkbox - When checked, points are exported based on the project's "True North" orientation. If unchecked, the angle specified in the Origin option is used.
- Override Default Point Family - Allows you to pick your own Point family. The family name is required to start with eV_Point
Export Options panel
- Include DWG Background checkbox - When checked, a .dwg file of the active view is exported to the same location and will have the same name as the point export file.
- Include Linked Points checkbox - When enabled, points within any loaded linked models are displayed in the Point Manager.
NOTE: Linked model points are read-only and are not editable.
File Naming panel
- Append Origin selection to file name checkbox - when selected, the current origin selection name in the format "_Origin" is appended to the end of the file name.
- Append data to file name checkbox - when selected, the current date in the format "_YYYY-MM-DD" is appended to the end of the file name.
- Append time to file name checkbox - when selected, the current 24-hour time in the format "_HHMM" is appended to the end of the file name.
Use Custom ITM Hanger Description panel
- Use Custom ITM Hanger Description menu - allows for overriding the description used for ITM hangers. If not provided, the system default value is used.
Use Custom ITM Hanger Layer panel
- Use Custom ITM Hanger Description menu - allows for overriding the layer value used for ITM hangers. If not provided, the system default value is used.


Point Settings\CSV Configuration tab
The 'CSV Configuration' tab defines the parameters and the order in which they are displayed within the point export file.
Available Parameters panel
The 'Available Parameters' list displays a list of valid parameters used to create the point export file. Parameters in this list will not be included in the point export file.
- Add item -
 when clicked, the selected item in the 'Available Parameters' list is added to the 'Selected Parameters' list.
 - Remove item -
 when clicked, the selected item in the 'Selected Parameters' list is removed and re-added to the 'Available Parameters' list.
Selected Parameters panel
The 'Selected Parameters' list displays the parameters that will be included in the point export file. The order and position of parameters in this list dictate how the parameters appear in the point export file. The order of the parameters in the 'Available Parameters' list from top to bottom is the same order from left to right in the CSV file.
- Move Up -
 when clicked, the selected item in the 'Selected Parameters' list is moved up from its current position.
NOTE: this button is disabled when the item can no longer move up within the list. - Move Down -
 when clicked, the selected item in the 'Selected Parameters' list is moved down from its current position.
NOTE: this button is disabled when the item can no longer move down within the list.
Preview panel
Displays how the parameters will be shown in the CSV file.


