Customize Ribbon Tabs
 Updated 18 hours ago
by
Kerry Poe

Summary
Used to customize the name, contents, and layout of the eVolve tab(s) in the Revit ribbon.
- eVolve tab ⮞ Resources panel ⮞ Settings menu ⮞ Customize Ribbon Tabs button


Usage
Opening the Ribbon Panel Configuration window
- From the eVolve ribbon, in the Resources panel, click the Settings menu, then click Customize Ribbon Tabs.
The Ribbon Panel Configuration window opens, displaying the panels for the current tab.

Window Overview
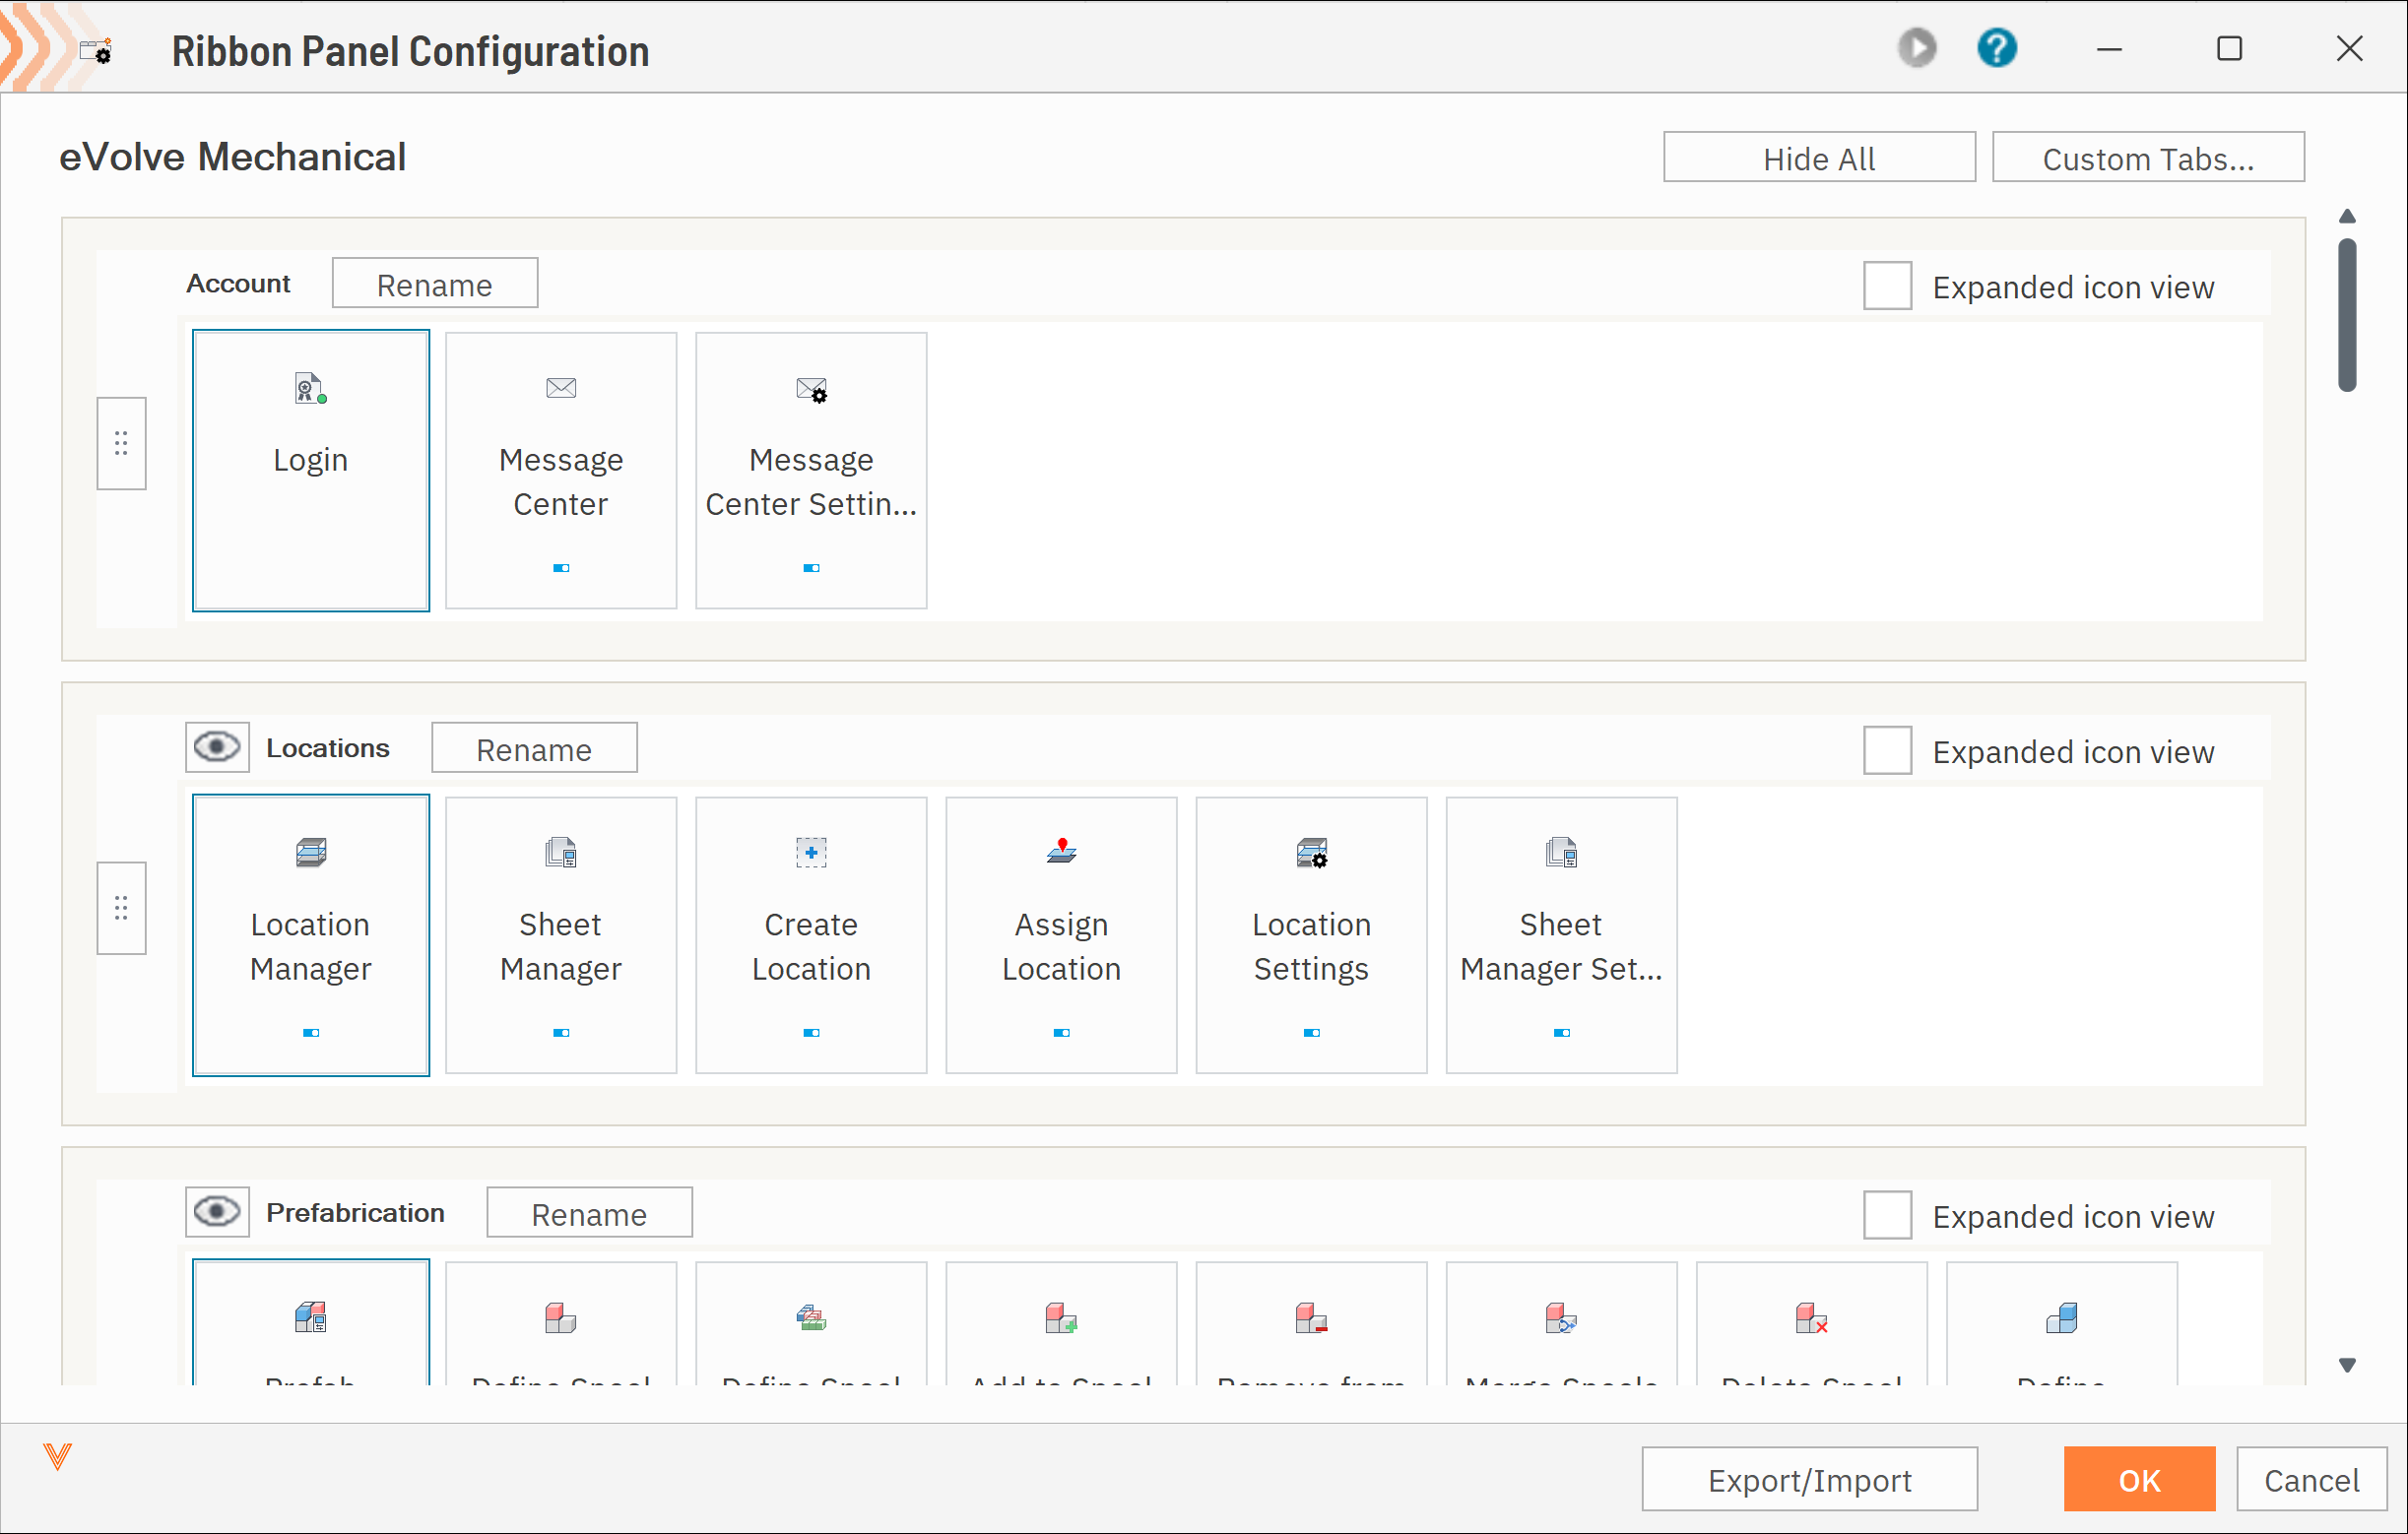
Ribbon Panel Configuration window
Header
- Tab name - displays the name of the tab currently being configured.
- Hide All/Show All - hides or shows every panel on the current tab.
- Custom Tabs... - opens the Manage Tabs window.
Panels
- Drag handle - drag to change the order in which the panel appears in the ribbon.
- Eye icon - shows or hides the panel.
- Rename - opens the Rename Panel window to define a custom panel name. Leave the name blank to restore the default.
- Expanded icon view checkbox - when enabled, buttons are displayed side-by-side along with the name of each feature.
- Button toggles - shows or hides individual buttons within the panel.
Window buttons
- Export/Import
- Export to File - Saves the current configuration on the window to a selected file.
- Import From File - Reads the user selected file and restores the window to the exact configuration of that specified in the selected file.
- OK - saves changes a
nd closes the window. Revit must be restarted for the changes to take effect. - Cancel - closes the window without saving changes.
Manage Tabs window
- Add New Tab
- Name - defines the tab name/title.
- Add Tab - creates a new tab with the specified name.
- Tabs list - lists all tabs. Select a tab and click OK to configure it.
- Delete - removes the selected tab.
- Rename - renames the selected tab.

Reordering panels
- From the Ribbon Panel Configuration window, hover over the drag handle to the left of the panel you want to move until the Drag to reorder cursor appears.
- Drag the panel up or down to its new position.
NOTE: Panels appear in the ribbon from left to right in the order they are listed, with the top panel appearing to the far left. - Click the OK button to save and close the window.
Showing or hiding panels
- From the Ribbon Panel Configuration window, click the eye icon next to the panel name to hide the panel. Hidden panels are grayed out. Click the eye icon again to show the panel.
NOTE: The Account panel does not have an eye icon and cannot be hidden. - To hide every panel on the tab at once, click Hide All. The button changes to Show All; click it to show all panels again.
- Click the OK button to save and close the window.
Showing or hiding individual buttons
- From the Ribbon Panel Configuration window, locate the button within its panel.
- Click the toggle below the button name to hide the button from the ribbon. Click the toggle again to show the button.
- Click the OK button to save and close the window.
Renaming panels
- From the Ribbon Panel Configuration window, click the Rename button next to the panel name.
- From the Rename Panel window, in the Name field, enter the new panel name.
NOTE: Leave the field blank to restore the default panel name. - Click the OK button.
Using expanded icon view
- From the Ribbon Panel Configuration window, select the Expanded icon view checkbox for the panel.
Expanded icon view displays each button in the panel side-by-side along with the name of the feature. - Click the OK button to save and close the window.
Creating and managing custom tabs
- From the Ribbon Panel Configuration window, click the Custom Tabs... button.
- From the Manage Tabs window, in the Add New Tab section, enter a name/title for the tab in the Name field, then click Add Tab.
- To rename or delete a tab, select it in the Tabs list, then click Rename or Delete.
NOTE: The main eVolve Electrical tab cannot be deleted. - To configure a tab, select it in the Tabs list, then click OK.
The Ribbon Panel Configuration window displays the panels for the selected tab, and the tab name appears in the upper left corner of the window.
Importing/Exporting Configurations
- From the Ribbon Panel Configuration window, in the lower right corner of the window, click Export/Import.
- Click Export to File or Import From File.
- Specify the file path in which you would like to either import a configuration from, or to where you like to export your current configuration to.
- Click the Save button when exporting, or the Open button when importing.
Saving changes
- From the Ribbon Panel Configuration window, click the OK button.
- From the Restart Required message, click OK, then restart Revit for the changes to take effect.

Tips and Tricks
- The Account panel cannot be hidden, and the Resources panel MUST remain visible on at least one tab.
- While all panels may appear multiple times and on multiple tabs, the Integrations panel may only appear on one tab.
- Using Expanded icon view will ensure the name of the command is displayed.
- Changes are not applied to the ribbon until Revit is restarted.
Best Practices
- Use multiple tabs to take advantage of the Expanded icon view feature. Each button will always be visible (even on lower screen resolutions), and the button name text is displayed. This makes it easy to find your favorite buttons and new or unexplored buttons.
- Export your configuration to a file so it can be shared with your team or restored later.

