Hanger Placement Settings

- Hanger Placement Settings
Hanger Placement Settings

Summary
The Hanger Placement Settings area allows for creating placement rule sets and defining hanger, embed, and collision detection options.
- eVolve tab ⮞ Resources panel ⮞ Settings Menu ⮞ Hanger Placement Settings button


Overview
Common Functions
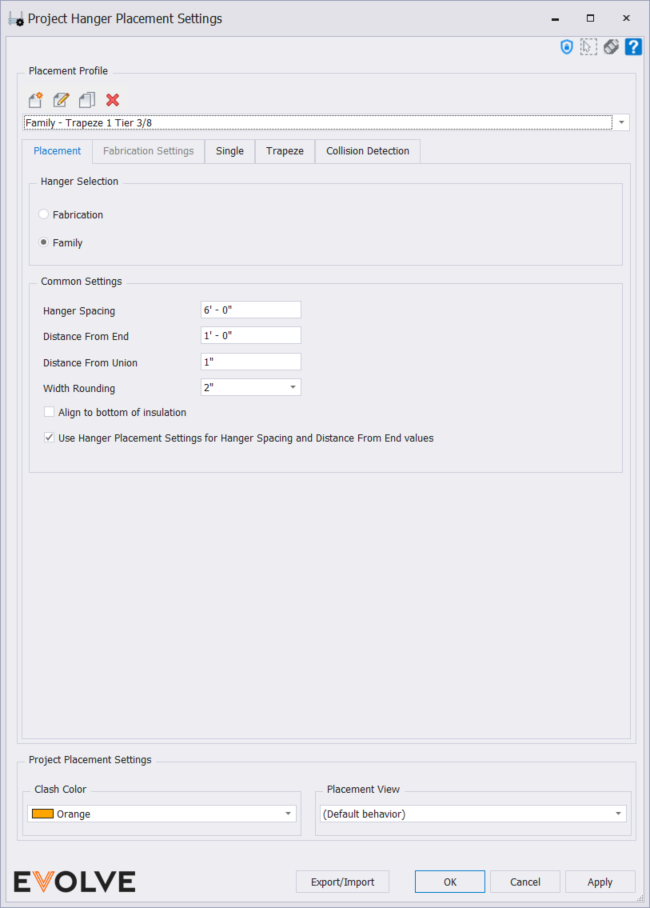
Placement Profile tool palette

- Placement Profile button - used to create a new placement profile.
- Rename Placement Profile button - used to change the name of an existing placement profile.
- Copy Placement Profile button - used to duplicate an existing placement profile.
- Delete Placement Profile button - used to remove an existing placement profile.
- Placement Profile menu - displays existing placement profiles.
Project Placement Settings panel

- Clash Color menu - used to select and display the color to highlight collisions.
- Placement View menu - specifies the option or explicit view to use when calculating clashes. If an explicit view is selected, it should exist within the project and with all relevant elements and links set to visible. Supported elements and structural elements must be visible and may not be underlay elements.
Hanger Placement Settings/ Placement tab
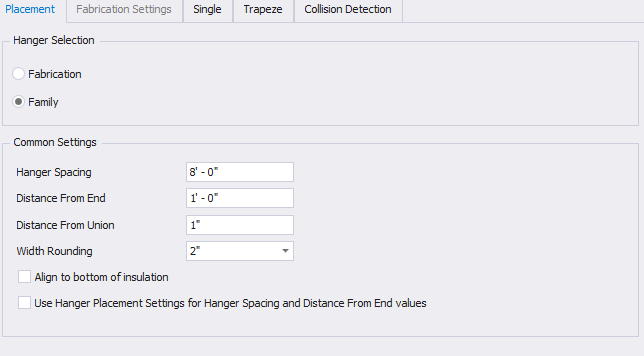
Hanger Selection panel
- Fabrication radio button - when selected, the current profile will use Fabrication (ITM) hangers.
- Family radio button - when selected, the current profile will use Family (RFA) hangers.
Common Settings panel
- Hanger Spacing input box - defines the space between trapeze hangers.
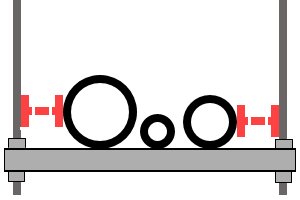
- Distance From End input box - defines the spacing hangers are placed from the end of a run or a change of direction, like a bend, tee, etc.
- Distance From Union input box - defines the spacing away from a union when the trapeze spacing results in a collision with a union.
- Width Rounding menu - the selected value defines incremental rounding the hanger's width is rounded up to.
- Examples: based on a hanger's calculated width being 3' - 1"
- If the Width Rounding is set to 2", then the final width is 3' - 2"
- If the Width Rounding is set to 6", then the final width is 3' - 6"
- If the Width Rounding is set to 1'-0", then the final width is 4' - 0"
- Examples: based on a hanger's calculated width being 3' - 1"
- Align to bottom of insulation checkbox - when selected, the hanger's elevation is offset by the thickness of the part's insulation.
- Use ITM Hanger Settings for Hanger Spacing and Distance from End values checkbox - when selected, the Trapeze Spacing and Distance from End values are disregarded. Instead, the values specified in the ITM Hanger Settings are used.
Hanger Placement Settings/ Fabrication Settings tab

- Service Type menu - defines the Fabrication service used for the selected profile.
- Hanger Type menu - defines the type of Fabrication hanger used for the selected profile.
Hanger Placement Settings/ Single tab
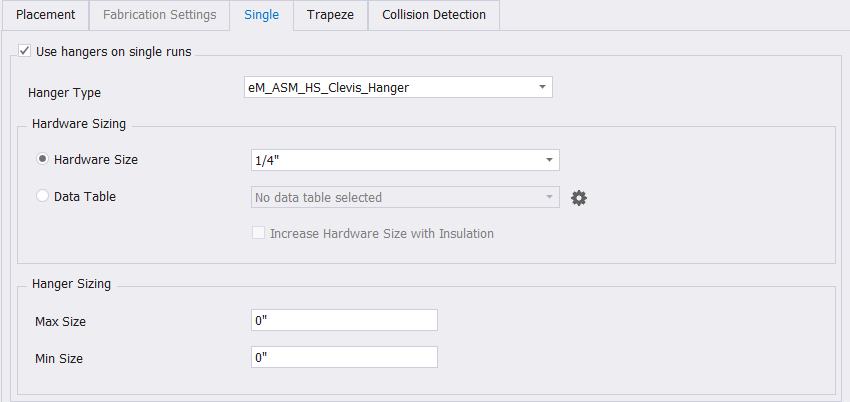
- Use hangers on single runs checkbox panel - when enabled, instead of placing a trapeze hanger, single hangers are placed on round straights up to the defined Max Size, then a trapeze hanger is placed.
- Hanger Type - Displays available single rod hanger types.
- Hardware Size - Defines the hardware size used for the selected hanger type. If the hanger uses a lookup table for hardware size and Use_Family_Hardware_Sizing is checked in the family, this option will be grayed out. If those conditions are not met, you may specify the hardware size. The hardware sizes available are dependent on the hardware parameters available in the family
- Max Size - Defines the largest pipe/conduit diameter to place a single hanger. If the hanger uses a lookup table for sizing, this dropdown will populate with the sizes available in the table. If the hanger does not use a lookup table, you may specify a size.
Hanger Placement Settings/ Trapeze tab
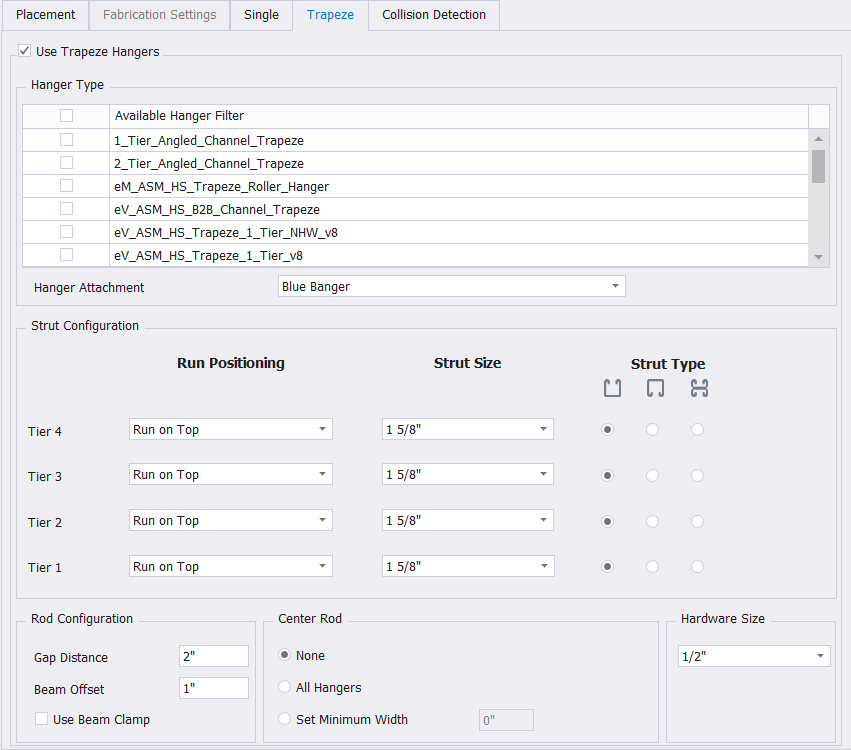
- Use trapeze hangers checkbox - if unchecked the use of trapeze hangers in Hanger Placement will be disabled.
- Hanger Type panel
- Hanger Type drop down menu checkbox - defines the type of trapeze hanger used in the profile. By default, every hanger will be checked. User can deselect hangers when a specific hanger needs to be used. When a new hanger profile is created, all hangers will be checked.
- Valid Hanger Type families - all of the following requirements must be met by the family to appear in the menu
- Family category equals one of the following
- Cable Tray Fittings
- Conduit Fittings
- Electrical Fixtures
- Duct Fittings
- Pipe Fittings
- Plumbing Fixtures
- Specialty Equipment
- Has parameter named "eVolve_Feature" equal to one of the following
- Hanger
- Trapeze
- Supports
- Family category equals one of the following
- Legacy parameter requirements - if the parameter "eVolve_Feature" is not found all of the following requirements apply
- Parameter "eVolve_Category" equals "Hangers"
- Parameter "eVolve_Subcategory" contains "Trapeze"
- Valid Hanger Type families - all of the following requirements must be met by the family to appear in the menu
- Hanger Attachment menu - defines the type of attachment that is used on the hanger
- None
- Beam Clamp
- Blue Banger
- Embed
- Rod Coupling
- Hanger Type drop down menu checkbox - defines the type of trapeze hanger used in the profile. By default, every hanger will be checked. User can deselect hangers when a specific hanger needs to be used. When a new hanger profile is created, all hangers will be checked.
- Strut Configuration panel - the Strut Configuration is set up using a grid layout with columns and rows. The rows define the hanger types, while the columns define the hanger type's configuration.
- Run Position menu - defines the location of the conduits for the specified tier
- Run on Top
- Run on Bottom
- Strut Size menu - defines the strut size for the specified tier
- Strut Type radio button - defines the strut type for the specified tier
- Standard Strut
- Inverted Strut
- Back to Back Strut
- Rod Configuration panel
- Gap Distance text box - defines the gap between the edge of the part and the threaded rod
- Beam Offset text box - defines the gap between the hanger rod and the beam when a hanger rod clashes with a structural beam element.
- Use Beam Clamp checkbox - automatically sets Hanger Attachment to Beam Clamp if Beam Offset is invoked
- Gap Distance text box - defines the gap between the edge of the part and the threaded rod
- Center Rod panel
- None radio button - no center rod is applied
- All Hangers radio button - apply a center rod to all trapezes
- Set Min Width radio button - will only apply a center rod to the trapeze instance where the overall width is equal to or greater than the value entered
- Hardware Size panel
- Hardware Size menu - defines the hardware size used for the given profile
Hanger Placement Settings/ Collision Detection tab
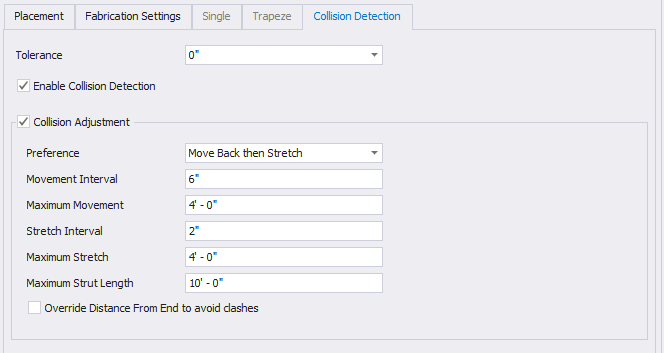
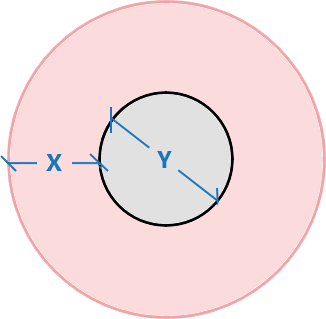
- Tolerance menu - the tolerance value (X) extends from the outside diameter of the rod (Y) and should account for any insulation that may be present as well as the distance between the rod and the part it is supporting.
- Enable Collision Detection checkbox - enables/disables collision detection
- Collision Adjustment checkbox panel - when selected, the hanger's placement location and/or size are adjusted according to the below preferences to avoid collisions. If a collision is unavoidable based on the specified preferences, the hanger is moved back to its original location and highlighted.
- Preference menu
- Move Back then Stretch - If a collision is detected, the hanger is moved back based on the Movement Interval. If a collision is still detected, the hanger's width is stretched (increase width) and then moved again to avoid collisions.
- Stretch then Move Back - If a collision is detected, the hanger's width is stretched (increase width) based on the Stretch Interval. If a collision is still detected, the hanger is moved back based on the Movement Interval and then stretched again to avoid collisions.
- Move Back - If a collision is detected, the hanger is moved back based on the Movement Interval.
- Movement Interval text box - incrementally moves the hanger closer to the previously placed hanger based on the specified value
- Maximum Movement text box - the maximum distance the hanger is moved towards the previously placed hanger
- Stretch Interval text box - incrementally increases the hanger width based on the specified value
- Maximum Stretch text box - the maximum distance the strut will increase per side
- Maximum Strut Length text box - the width of the strut will not exceed the specified value
- Override Distance From End to avoid clashes checkbox - when enabled, the Distance from End value may be disregarded if a collision is detected.
- Preference menu
- Collision Adjustment checkbox panel - when selected, the hanger's placement location and/or size are adjusted according to the below preferences to avoid collisions. If a collision is unavoidable based on the specified preferences, the hanger is moved back to its original location and highlighted.
